Concrete Contractors

How to Make Your Concrete Look Brand New

Concrete surfaces are constantly exposed to the elements and can suffer damage. It is important to assess and address damage promptly to prevent further deterioration, maintain a safe environment, and minimize repair costs.

Concrete

There are several methods to repair concrete, depending on the type and severity of the deterioration. Surface repairs involve filling in damaged areas with a patching material. Contact Concrete Repair Eau Claire for professional help.

Concrete cracks are common occurrences that can be quite unsightly. But they don’t have to be, and with a little work and the proper materials you can make your concrete look brand new!

Before starting any crack repair, it is important to evaluate the crack and its origin. Different cracks require different repair methods. It is also important to know whether the cracks are dormant or active. This will allow you to choose the best repair method for your project.

If the crack is wet, you should try to stop the water leak first. This can be done with a polyurethane crack injection. This is a highly water reactive resin that is injected into the crack under pressure. It reacts with the water in the crack and begins to foam, filling the crack and creating a flexible seal that prevents future leaks. This type of repair can be used on both dormant and active cracks.

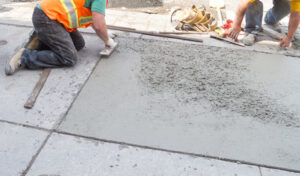
To prepare the surface to be repaired, a good pressure washer with detergent should be used to clean the area. Any dirt or debris should be removed from the crack so that the filler material can bond with the concrete. Then, you should use a hammer and chisel to chip away any lingering concrete from the crack site. This will create a backward angle in the crack, which will help the filler hold the crack together.

After the surface has been cleaned, it is a good idea to prime the crack with a solvent-based primer. This will ensure that the bonding between the filler and the concrete is strong. Then, you can apply a high-quality epoxy or polyurethane crack coating to the surface of the concrete. These crack coatings will protect the concrete from further deterioration and help it retain its beauty and functionality for as long as possible.

When choosing a concrete crack repair product, it is important to read the label and follow the directions carefully. If you are unsure about what type of crack you have or how to repair it, it is always recommended that you consult with a professional concrete contractor, such as K&E Flatwork. They can provide you with the advice and materials you need to get your concrete looking its best!

Repairing Leaks

If you have a leaky slab, it can cause serious damage to the foundation of your home. Fortunately, there are many ways to fix it. First, it’s important to find the source of the leak. Plumbers use a variety of tools including sonic, pressure, electromagnetic and fiber optic leak detection to locate and pinpoint the source of leaking water or gases.

Then, you’ll need to determine the extent of the damage. Depending on the severity, you may need to repair just a few cracks or your entire concrete foundation. The next step is to select the right repair material. You’ll need to consider the dimensional characteristics of the repair materials, including shrinkage and expansion rates. It’s also important to look at the bonding properties. You’ll want to ensure that the repair material will be able to adhere to your existing concrete, and that it’s durable in freeze-thaw conditions.

Once you’ve selected the right repair material, you can start the process of repairing the leak. The best way to do this is to hire a professional contractor. They can use a wide range of tools and techniques to get the job done quickly and effectively. They can even help you avoid costly repairs in the future.

When you’re ready to hire a contractor, make sure you ask for references. This will help you assess their skills and experience and decide whether they’re the right fit for your project. Also, be sure to check out their customer reviews. This can give you an idea of their level of expertise and how satisfied previous customers have been with their services. Lastly, it’s important to ask about their pricing. This will help you determine whether they’re a good fit for your budget.

Repairing Cracks in Walls

Cracks in walls can be caused by many factors. It’s essential that you identify and address all the issues causing the cracking. This will prevent the problem from reoccurring and save you money in the long run. It’s also important that you use the right concrete repair method for the job. For instance, using surface repair methods for structural damage will only offer a temporary solution and increase repair costs.

If the cracks are a result of a structural failure you’ll need to employ more advanced repair techniques, such as epoxy injection and grouting or stitching. These will address the root cause of the issue and help strengthen the damaged concrete.

For small to medium-sized wall cracks, you can use a cement crack filler or crack sealer, such as Selleys No More Gaps Coloured Caulk. These products will fill the crack, stop moisture and provide a more attractive finish for your wall. The first step is to prepare the surface of the cracked area by cleaning and removing any loose or flaking material. You can also use a power broom to give the surface a smooth, even appearance.

You’ll also need to make sure that the crack is dry before you start the repair. This can be done with a dehumidifier or by spraying it down with water. You can also use non-destructive evaluation methods, such as radar and impact echo to determine the extent of the damage without opening up the concrete.

When you’re ready to begin the repair, first apply a bonding agent to the surface of the concrete and let it dry. This will ensure the repair material adheres to the concrete and doesn’t pull away from the crack. Then, use a joint knife to apply a thin coat of joint compound over the crack, taking care not to expose the paper tape. Once the compound has dried, sand the surface lightly to create a smooth, even appearance.

Finally, you can add a second or third coat of joint compound, but only after the concrete has completely dried. Be sure to sand the second or third coat very lightly, so you don’t expose the paper tape. When the repair has cured, you can paint or stain it to match the existing surface.

Repairing Cracks in Floors

Concrete is a hard material, strong and long lasting but even it can crack over time. Cracks can be caused by many factors such as ground movement, corrosion of metal reinforcement, overloading and poor initial construction and repairs. It is important that cracks are identified and repaired quickly to avoid further damage and potential recurrence.

The first step to repairing a concrete floor crack is to clean out the cracked area. This is essential to ensure that the repair materials are able to bond with the existing concrete. Loose dirt, gravel, and debris will prevent the crack filler from adhering properly. This is especially important in high traffic or heavy load areas. Use a wire brush or chisel to remove loose concrete from the surface of the crack. This will also help expose any loose parts that may need to be repaired.

Next, prepare the crack for repair by stuffing foam backer rod into the crack. The rod should be a diameter slightly larger than the crack width. The rod will create a support for the repair materials, helping them to hold their shape and resist shear or bending forces. Once the crack is prepared, the masonry repair product can be applied. There are a number of products on the market including epoxy putty, polyurethane sealants, and masonry patching compounds. Choose a product that is designed for the specific type of crack you are repairing.

Once the repair materials are applied, the crack should be allowed to dry for 24 hours. If the crack is exposed to weather, cover it with a piece of plastic. It is also recommended that you periodically inspect the crack to see if it is still stable. If the crack does begin to widen or worsen, it is necessary to call a professional for additional assistance.

When it comes to repairing a structural concrete foundation, the repair method will depend on a number of factors such as the size and extent of the cracks, and the environment and loads in which the structure is used. For example, major cracks in concrete can often be repaired using hydraulic cement that expands as it cures, effectively filling voids and tightly sealing the cracked concrete.

Plumbing

How to Repair a Faucet Like a Plumber

Plumbers install, repair, and maintain piping, fixtures, and appliances that facilitate water, gas, and waste management in residential and commercial settings. They also collaborate with other professionals, such as construction teams and architects, to ensure that plumbing systems integrate seamlessly into building projects and comply with relevant standards and regulations. Contact Plumbers Bradenton for professional help.

Plumber

The faucets in our homes often need repair to keep them working properly. Even a small leak can waste a great deal of water and cause damage underneath the sink, making it important to address problems as soon as they occur. If you’re not comfortable with taking on a DIY plumbing project, it may be wise to contact a professional plumber for assistance. However, if you are willing to invest the time and effort, there are steps you can take to repair your own faucet.

To start, shut off the water supply valves under the sink (hot and cold) to prevent the accidental release of water. Next, remove the faucet handle by prying off the decorative index cap on the handle (if there is one) and unscrewing the handle screw with a screwdriver. You can then pry off the handle or use a handle puller to remove it. If the handle is stuck, try tapping gently on it with a hammer. If the handle still does not come off, it is likely because of rust or corrosion. A plumber would likely recommend replacing the entire handle.

Once the handle is off, you can access the internal components of the faucet by turning the adjusting ring counterclockwise with a spanner tool that comes with many faucet repair kits. If you’re experiencing leaking around the base of the spout, it is likely due to worn O-rings located under the spout. You can replace these O-rings with a kit that includes a washer and a neoprene seal, or you can purchase a single replacement at your local hardware store.

Leaking from the spout base is most likely due to the O-ring or the plastic seat that the spout rests on. These can become dry, cracked, or worn over time and will not provide the proper seal. This is likely due to poor design or installation, inadequate lubrication, or simply age and wear.

A creaking sound coming from the handle stem is usually a sign that it’s time to replace it. This is because it has worn down, and it is banging against the other components of the faucet when you turn it on. You can sometimes fix this problem by coating the handle stem with plumber’s grease, but if it is worn out completely it’s best to just get a new one.

Identifying the Fault

Plumbers install and repair pipes, fixtures and appliances in homes, businesses, and factories. Their work involves laying out piping systems, setting toilets and sinks, installing faucets and other fixtures, and connecting plumbing to appliances like dishwashers and washing machines. They also do regular maintenance on plumbing systems to prevent leaks and clogs, and make sure that all parts of a system are working correctly.

Plumbers use a variety of tools and equipment to do their job, including wrenches, pipe cutters, soldering equipment, and drain snakes. They also need to be comfortable working in confined spaces and with electrical equipment, and must adhere to all relevant safety protocols. Many states require plumbers to be licensed before they can practice their trade. Licensing requirements vary by state, but generally involve passing an exam and completing a apprenticeship program. Plumbers can also choose to pursue certification in specific areas of the field, such as working with specific types of equipment or green plumbing practices.

One of the primary duties of a plumber is to inspect a home or business’s plumbing to determine if there are any issues that need to be addressed. This includes examining the condition of the pipes, appliances, and fixtures, as well as testing the water pressure in the home or business. If the plumber detects an issue, they will recommend a course of action and provide a quote for the work.

In addition to performing routine maintenance on plumbing systems, plumbers often respond to emergency calls to fix issues like leaking faucets or clogged drains. They may also be responsible for repairing or replacing gas lines, which requires special training and knowledge of safety regulations.

Plumbers often collaborate with construction teams and architects to ensure that plumbing systems are integrated seamlessly into building projects. They also analyze blueprints and other documents to understand the layout of a plumbing system and ensure that all components meet building codes and regulations. Whether they’re inspecting a new plumbing system or repairing a faulty faucet, plumbers must be adept at troubleshooting and problem-solving to identify the root of the issue and come up with effective solutions.

Replacing the Faulty Part

Plumbing systems are vital to the operation of a home or business, taking away waste water, providing hot and cold water and regulating indoor climate through pipes, valves, fixtures and fittings. When problems occur, plumbers are called in to inspect, repair and maintain the system. These experts work with a variety of tools, equipment and machinery to ensure that the system runs smoothly and efficiently.

The profession requires a high level of skill and knowledge, including an understanding of physics, mathematics, hydraulics, thermodynamics, electrical engineering and chemistry. Plumbers must also be familiar with a variety of construction materials and building codes, including fire safety regulations. In addition, they must be able to troubleshoot issues and find solutions quickly and effectively.

Most plumbing professionals complete a trade school program followed by an apprenticeship, which lasts anywhere from two years to five. During the apprenticeship, plumbers learn all aspects of the trade from experienced mentors and gain hands-on experience in the field. Then, they must pass an exam to become licensed in their jurisdiction. Licensing requirements vary by jurisdiction, but may include passing an exam, completing a training program and working under the supervision of a master plumber.

Plumbers are responsible for installing and connecting piping, fixtures and appliances such as sinks, toilets, showers and water heaters in new construction and renovation projects. They also inspect existing piping, testing pressure levels and locating leaks and blockages. They use a variety of tools and techniques to fix these problems, including soldering, brazing, crimping, solvent welding and threaded fittings. Plumbers also perform routine maintenance on a variety of plumbing systems, including cleaning drains and repairing and replacing components.

This is a physically demanding job that involves lifting heavy objects and spending long periods of time on feet. It is important for plumbers to have physical strength and stamina as well as manual dexterity to manipulate small parts and tools. In addition, plumbers often must climb and crawl through tight spaces, so they should be comfortable with these challenges. Finally, they must be able to handle stressful situations, such as when a customer is angry or upset.

Reassembling the Faucet

Many plumbing jobs require the plumber to remove and install new parts. This can be a daunting task and requires some special tools to complete successfully. The key is to work carefully and methodically, and to lay out all the parts in order as you remove them so that you can re-assemble the faucet correctly. When you’re finished, be sure to turn on the water and check for leaks.

The aerator on a sink faucet can become clogged with hard water deposits and other gunk over time. Cleaning out the aerator on a regular basis is a good idea to keep it working properly. The process involves removing the handle, unscrewing the retaining screw (which may be a hex screw), and then removing the aerator assembly. This can be a tricky job for a do-it-yourselfer, but with some patience and the correct tools, it’s not too difficult.

After turning off the water at the main shutoff, use a pair of adjustable pliers to remove the sink handle. Then locate the small hex screw on the side or back of the handle, which is used to hold it in place. Insert the end of a screwdriver into the hex screw and turn counter-clockwise to loosen it. Then remove the screw and set it aside.

Now you’re ready to remove the sink cartridge. This is a plastic or metal part that fits inside the valve stem assembly. If you have a double-handle faucet, there will be two of these cartridges—one for hot and one for cold. You can use a wrench to remove the nut that holds the cartridge in place, then pull or pry it out.

Commercial plumbers are responsible for a wide range of tasks, including installing and connecting pipes, fixtures, and appliances. They also interpret blueprints and building specifications to lay out piping systems and ensure they meet the necessary standards and regulations. They often work in construction sites alongside other tradespeople, and they may have to travel between jobs. They also have to deal with a greater variety of issues, such as clogged drains, toilets, and sewage systems.